
Project Walkthrough
Two-Sided Machining with Alignment Dowels
Carve both faces of a wooden tray or sculpted part accurately using VibeCNC's Double-Sided workflow and asymmetric spoilboard dowel pins.
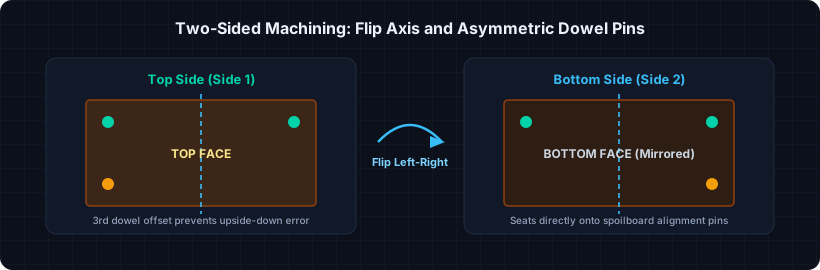
Two-sided CNC work lets you carve sculpted bowls, double-sided signs, and contoured handles. The single most important detail is registration: when you flip the board over, X and Y must line up within a few thousandths of an inch. Asymmetric alignment dowels make that registration foolproof.
Step 1: Configure a Double-Sided Job
- Open Setup and select Double-Sided job type.
- Set stock dimensions (for example,
14" x 9" x 1.0") and set XY Datum to Center so flipping left-to-right keeps the origin dead center. - Choose your Flip Direction (Left-to-Right around the Y axis, or Top-to-Bottom around the X axis). Stick to one habit in your shop so you never second-guess a flip.
- Set Z-Zero to Material Surface on Side 1 and Machine Bed (Spoilboard) on Side 2 (or keep both consistent if your stock is surfaced to an exact uniform thickness).
Step 2: Place Three Asymmetric Alignment Dowel Holes
- On the Top Side, draw three
0.25"circles outside your finished part boundary (in the waste margin): two near the top corners symmetric across the flip axis, and a third near one bottom corner only. - Copy those dowel vectors to the Bottom Side using the side-transfer action so they automatically mirror across your chosen flip axis.
- On the Top Side, create a Drill (or small Inside Profile) toolpath for the dowel holes at depth
0.50"through the board margin. - Create a second matching dowel-hole toolpath to drill
0.50"deep into your spoilboard after removing the blank (or drill straight through the board into the spoilboard in one pass if your stock is thin).
Step 3: Design and Calculate Both Sides
- Carve the recessed tray interior or top relief on Side 1 (Top).
- Switch the active side toggle to Side 2 (Bottom). Carve the underside foot rim or contoured back, then add the final Outside Profile cutout with sturdy 3D Holding Tabs (at least 0.15" thick) so the finished part stays anchored until you free it.
- Use the 3D Preview multi-sided view to inspect both faces together and verify your wall thickness does not break through anywhere.
Step 4: Flipping at the Machine
- Run all Side 1 toolpaths, including the alignment dowel holes.
- Unclamp the board, insert snug 1/4" hardwood or steel dowel pins into the matching holes in your spoilboard, flip the board along the exact flip axis you chose in Step 1, and seat it firmly onto the pins.
- Re-clamp the board (using Keep-Out Clamp zones if clamps sit near the outer profile) and run the Side 2 toolpaths.